Thursday, March 28, 2013

Layers


As you can see, all of my layers have been named according to what they are in my photoshop. Also, all of the images that I needed to fix up with the eraser or paint brush were masked. 


Finally Finished!


I finally 
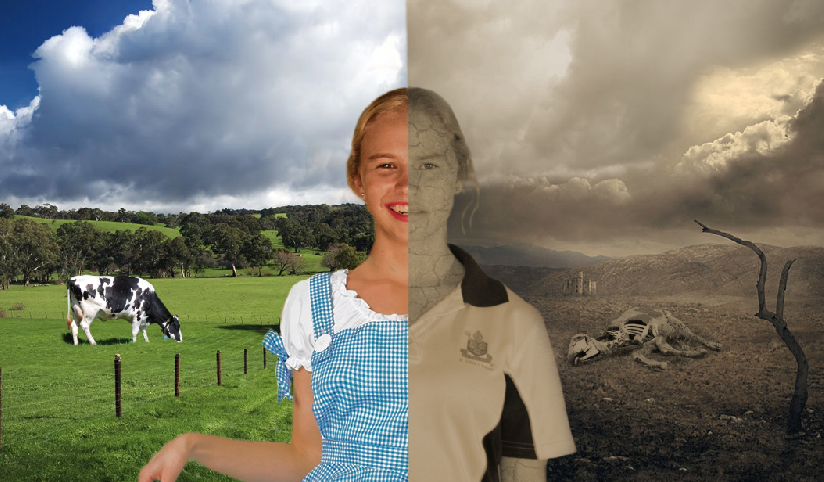
finished my Photoshop! Yaayy! The finalising touch I made was to make my happy half look as if I was holding something. I decided to make myself hold a fruit basket as this would create a good contrast between the dry and barren wasteland to fertile land that grows fresh fruit. I also changed the contrast and shadows of the fruit bowl so that the colour scheme would fit in with the environment around it. I also changed my sad half's top to being cracked to fit in with the scenery in that particular half. To make some finishing touches, I made sure every image had no areas that weren’t yet rubbed out by the paintbrush and also slightly changed some of the image’s colours to match the surrounding colours. I’m really proud with my overall result because it has turned out to look better than I first planned it on being! I have really enjoyed this photo-shopping unit for a number of reasons. They are:
  •           I’ve always wondered how people can photo shop images to look so realistic (such as models in newspapers)
  •           I love fiddling around with technology so photo shop easily became something to keep me entertained
  •           I also love photography and photo shop sort of became another way of modifying photos I already have in my iPhoto library


Even though we’ve finished our photo shop unit, I will still photo shop images just for fun in my spare time. Also, this will be a skill I can take all through school, university and my life! 


I tried uploading this image as a jpeg but it wouldn't allow me because the photo was too big! But I took a screenshot of the blown up image and I think it looks exactly the same as it did when it was a jpeg.

Friday, March 15, 2013

Progress Report #4

Today I got rid of my beach side and edited in lush, green farmland instead. I think this contrasts better with the drought because it is clear that one half is much happier than the other. I also edited myself to look like I'm wearing Dorothy from The Wizard of Oz's dress because I thought it would fit in well :) To make the clouds look more like one cloud, I duplicated the happy half's clouds and stuck the missing half of them onto the sad half. I think this helps the photo look more united as one instead of disjoined. I also found out that you can specifically change ares of the skin tone to be more skin-colour like or more tanned! So to match the skin colour of the body in the Dorothy dress, I modified my skin tone. Now my happy half doesn't even look like a different body has been photoshopped over mine.


This was what I found that made my skin tone change colour!


Thursday, March 14, 2013

Progress Report #3

Today I started photoshopping my happy half. I thought how the beach makes me happy so I made the background the back and also photoshopped myself to look like I'm wearing a bikini. I had to keep fiddling around with the colour scheme of my body to try and make it fit in with the background but it still doesn't look right! However I think I might change the beach theme to me being in lush fields with cows grazing on grass to contrast with the drought and barren land of my sad half.


Colour changing:

Assignment Progress Report #2

Today I added in a background for the sad half of my photoshop. I decided it should have something to do with suffering and pain because normally those make people feel unhappy. Once I had added that in and moved the layers around to make sure it was behind me, I also decided to give myself cracked skin to blend into the surrounding barren plain land. To add in a finishing touch, I also photoshopped the skeleton of a dead cow into the background to touch base with the 'suffering and pain' aspect. Here is the finishing look:


I'm planning on changing what I'm wearing to be something run-down and old, not my St Hilda's sport uniform.

Tuesday, March 12, 2013

Assignment Progress Report #1

Today I finally transferred the photos I will be using for my assignment onto my laptop. It took me a while to find the two photos I was going to use as well as blending the two together, but by the end of the lesson here is what I got:

Thursday, March 7, 2013

Trip to Hollywood!

At home in my spare time, I photoshopped a photo of when I went to Mount Tambourine to look like I had taken a trip to Hollywood. I masked out the rainforest and swapped it for a photo of California's landscape with the Hollywood sign in the background.